Practical Threat Investigation Workflows for Cloud (AWS), Identity (Okta) and Email (Cyren)
With the ever-increasing rate of large scale, high-profile cyber attacks such as the wave of ransomware campaigns, the cybersecurity community is busy hardening its security posture and improving its ability to spot malicious activities.
Unfortunately, we are all mainly equipped with often cumbersome, manual investigation workflows, and with point-based security sensors that detect and mitigate threats in a siloed manner: on the endpoint, network, cloud, etc.
But connecting the dots beyond the point solution that alerted on an incident is critical for effective containment and remediation.
In this blog post we present you with three must-have investigation methods you can implement in your SOC today in order to stitch alerts and threat signals together and easily identify malicious from benign activities, ultimately expediting detection and response times.
1. AWS Stolen Instance Profile Credentials Alert
Millions of users around the globe and their organizations rely on Amazon Web Services for cloud computing and storage services. Being part of the critical backbone of so many organizations makes the safeguarding of AWS credentials an essential piece of the organization's security puzzle.
EC2 instance profiles are AWS' method for securely providing EC2 instances with AWS permissions. By adding a role to an instance profile and attaching it to an EC2 instance, processes on that instance can access temporary API credentials generated for it (behind the scenes by EC2 using AssumeRole calls).
If an attacker obtains these credentials, they can make API calls with the EC2 instance profile to the allowed services, to perform lateral movement or other malicious activity.
Attackers obtain these credentials in two main ways:
- Compromising the EC2 instance, executing malicious code on it, and extracting the credentials.
- Exploiting vulnerabilities that allow an attacker to retrieve the machine credentials without code execution (for example, SSRF). In this case, they would use the credentials from their own infrastructure and not from the victim's EC2 instance.
The following investigation flow explains how to detect the usage of AWS instance credentials (STS credentials) outside of your environment and further investigate whether the action is malicious or benign.
Existing Public Detections:
Netflix security published a blog post covering the basic detection method, which consists in looking for more than one IP address that performs API calls with EC2 instance profile credentials. Amazon's GuardDuty service also has a similar detection, looking for instance profile credentials from an IP outside of EC2 IP ranges. But these techniques are insufficient for this case.
Why are existing detection techniques insufficient?
There are various benign situations in which several IP addresses use a specific set of credentials. This can create numerous false positives, damaging SOC productivity.
For example:
- If a machine with a public IP address reboots and receives a new IP address
- If a machine without a public IP accesses the internet through another machine (e.g. proxy), and the second machine reboots and changes its IP address
- If a user attaches an Elastic IP Address to a machine or detaches it
Suggested Investigation Flow
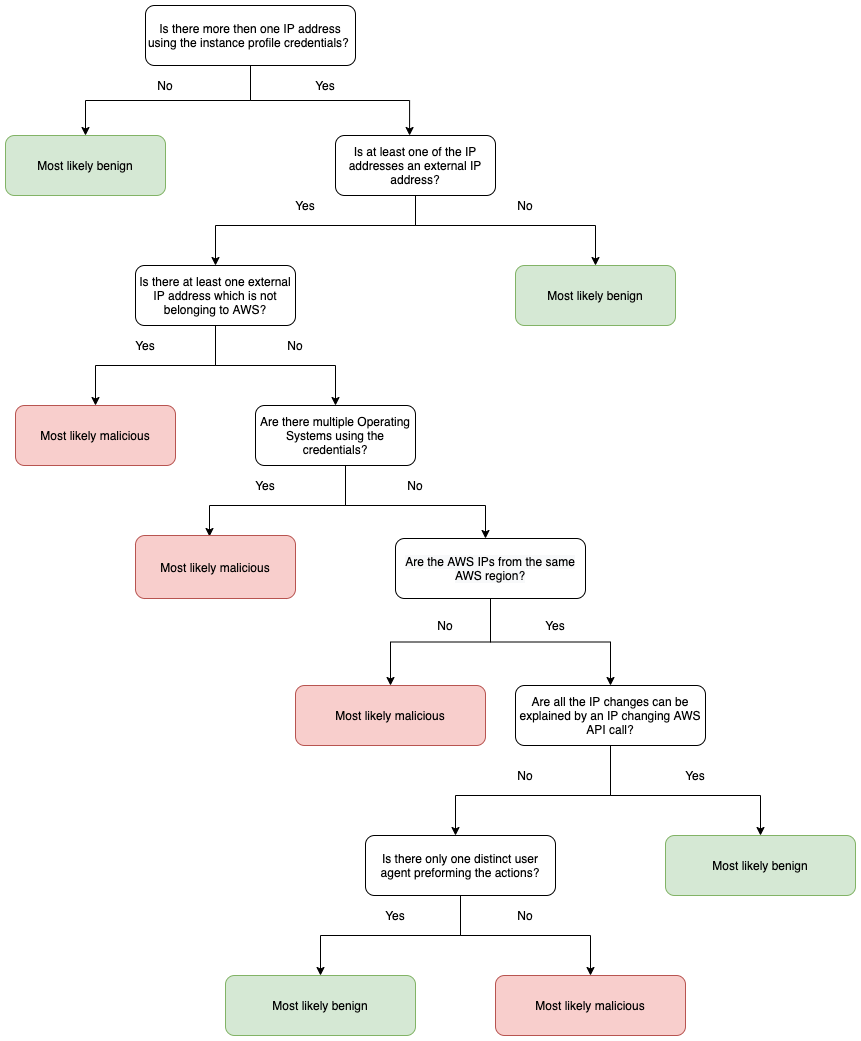
On top of the basic detections, we built an additional investigation flow, applied only in cases of external IP address usage of credentials. The entire flow acts as a decision tree, as at each intersection we dig deeper into the classification of the activity.
First, we ask questions under the assumption that there is more than one public IP address accessing an instance profile credentials.
The first question is whether at least one of the IP addresses is public and not a public AWS infrastructure IP address. If it’s not AWS accessing the credentials, it is more likely to be malicious.
The next inquiry is whether there are multiple different operating systems using the same credentials as seen in the user-agents of the requests. This is highly suspicious and indicates that two distinct machines/devices used the instance profile credentials.
The following inquiry will be if multiple AWS IP addresses have used the credentials.
If we see AWS IPs from more than one AWS region, it raises a flag as all the above legitimate use-cases would keep the changed IP in the same region, indicating a potentially malicious activity. In this use case, someone used the credentials illegitimately from AWS, but from a different region than the machine's region.
We use the opposite logic for the next inquiries, looking for benign activities, lowering the relevant alerts' urgency.
If all the IP changes can be explained by an IP changing the AWS API call (e.g. StartInstances, RebootInstances, AssociateAddress, etc.), it most likely explains the multiple IPs and thus likely signals a benign activity.
Also, if only a single IP change was spotted it is even more likely that something benign (but unknown) caused the machine to change IP from one AWS IP to another.
Finally, if there was only one distinct user agent with which all the requests from all public IPs were seen, then the chances are that an unknown cause led the machine to change IP from one AWS IP to another is even higher, and this activity is most probably harmless. Take a look at the flow diagram below.
2. Okta SuperHuman Activity
Okta is an identity and access management platform that helps companies manage and secure user authentication to applications.
Okta SuperHuman Activity is a detection that Okta offers to its customers. If you’re regularly dealing with Identity logs, you know that it's also one of the noisiest alerts out there.
Okta Super-Human is a geolocation-based detection, looking for an anomaly in the change of IP location over a short span of time (e.g. someone logs into their Okta account from the US and only a few minutes later the same user logs in from Europe, making this humanly impossible).
Suggested Investigation Flow:
- The first step is to obtain the IP of a geolocation ‘A’ as the detection can be applied only when activity in location ‘B’ takes place. It is important to remember that a malicious attacker might be behind any of these IPs.
- With both IP addresses, check if they are known as legitimately used by employees.
You can do that by searching for any physical presence of company devices or agents behind those IPs. For example, any office location or company VPN should historically have EDR/Proxy/Jamf agents communicating from it. So in the case that both IP addresses resolve with this list of company locations or VPN IPs, it is most likely to be benign and the alert can be crossed off the list.
If one of the IPs remains a “mystery”, the next vector to investigate is how likely it is that the same user is behind these two geolocations. - By extracting the user agent string from the Okta sessions, we can check whether both IPs have the same user-agent string. If they don’t, this indicates a highly suspicious activity that has a higher probability of being malicious.
Ask if this user was ever seen using any device that had such a user-string. If it was, it might be that the user accessed from different devices and it is most likely benign.
Another Okta feature that could be leveraged for this comparison is Okta device fingerprints. This fingerprint is Okta’s attempt at generating a unique signature per device. If both sessions used the same fingerprint, it provides a higher level of confidence than if both of these interactions originated from the same device.
If the inquiry is still not solved and we still suspect it's an attacker, it's time to look for anomalies in patterns of accessing organizational applications. For example, if in one session there were three unsuccessful attempts to login to the Okta master account, while in another session there was a successful login at the first attempt, this is suspicious and should be further checked.
We also recommend checking whether any of these sessions used MFA. If they did, and they leveraged the same factor, it is another sign that the activity is benign.
3. Cyren Malicious Email Detection
Cyren is a common threat intelligence and email security platform.
The following process will help classify malicious email alerts and decide the examination prioritization.
Once Cyren fires an alert, retrieve the Cyren related data, specifically: threat indicators, URLs, filenames, and hashes.
From here on, the investigation process can be classified as two scenarios:
- A phishing attempt, with an email including a malicious link referring to a malicious website.
- An email attachment that is potentially malicious.
Scenario A - Phishing Attempt:
For the first scenario, you would want to determine if the employee clicked the link (other services like Proofpoint automatically inform you if that’s the case). To do that, correlate the sent URLs with the proxy's network traffic. If such traffic exists, it should be the first thing to further investigate.
However, looking at proxy traffic is not enough since in some organizations there are no proxies, or events are missed by the proxy; or, not all devices are connected to the proxy.
SQL query to match threat indicator from Cyren to events in the proxy.
This is why we also recommend extracting the domain name and looking for EDR traffic to the domain (if you are able to look for specific URLs through EDR agents do that, but in most cases this is not an option). If less than X users (depending on your company size) accessed this domain, it is most likely that the link was clicked and the incident should be addressed ASAP.
Scenario B - Malicious Attachment:
If an attacker sent an email to one of the employees and Cyren classified it as malicious, additional tests should be carried out:
- The most important thing is determining whether the employee downloaded and executed the file. This can be done by looking for the file name in a CMD line, searching the file’s name in all the EDR executions. If you spot this type of CMD line, it is dangerous and should be addressed immediately.
SQL query to search for process executions with file name in the cmdline
- Next, look for file hashes on the disk by following file creation events from the EDR and searching for a file creation with a hash matching the malicious hash. If the file was deleted or self-destructed, the investigation will eventually lead to it.
Summary
Throughout this blog post we have covered three different investigation flows that can help determine if an alert is a false-positive or should be acted upon.
These are common scenarios that are often noisy, and therefore we recommend implementing them in your SOC, allowing you to connect the dots, more easily identify malicious from benign activity, and ultimately expedite detection and response.
At Hunters, these flows and many more are done automatically, followed by a sophisticated scoring module that determines the chance of an alert to be malicious and scores it accordingly, allowing the user to go over a cleaner alert line.
Learn more about how it works by watching a short demo video.


.png)